Saturday, August 21, 2010

Jules' Bonus: Card Sketches

Okay...so we know that you guys enjoy card sketches too....but since we just had a big card crop last weekend we are going to just do these two....

The deal is that in order for them to COUNT you MUST DO BOTH OF THEM!!! And for the second entry you would have to flip the second set. (so the MAX cards for this crop would be 4!)

AND you may ONLY USE 2 of the stash items ON EACH CARD!!! But they MUST be done with one of the sketches...no free cards on this one...sorry...

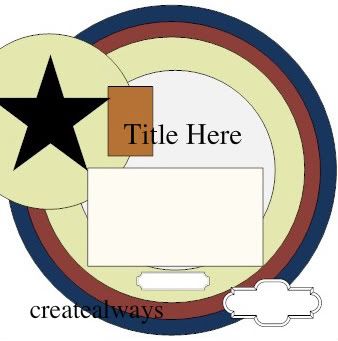
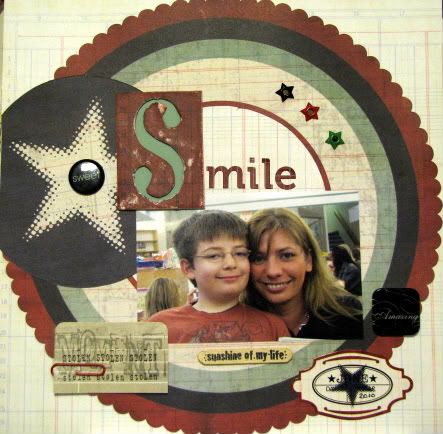
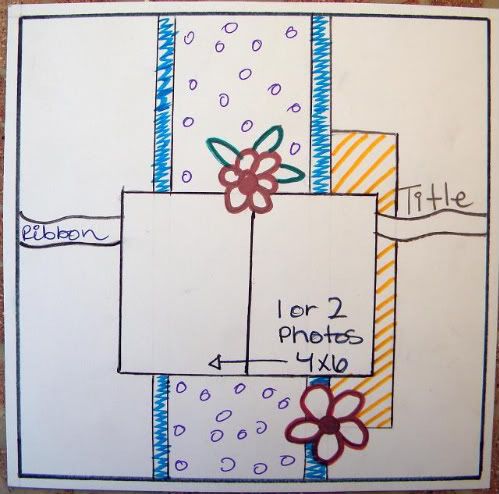
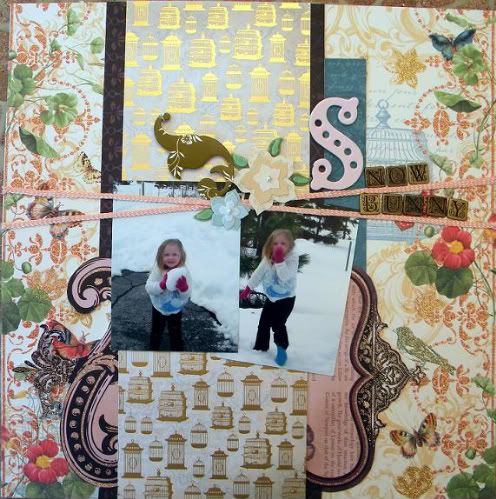
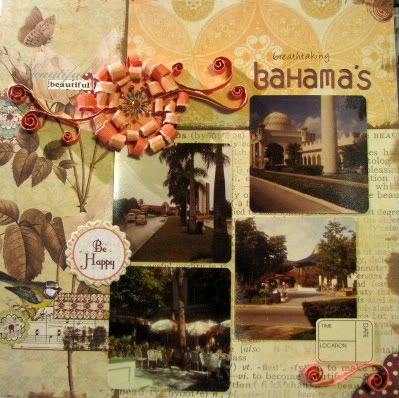
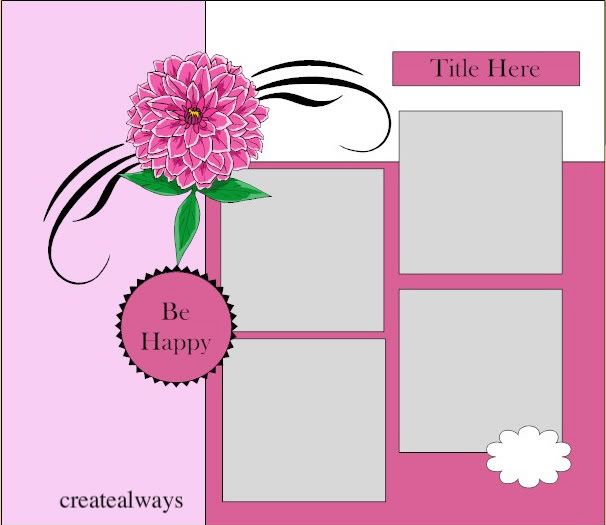
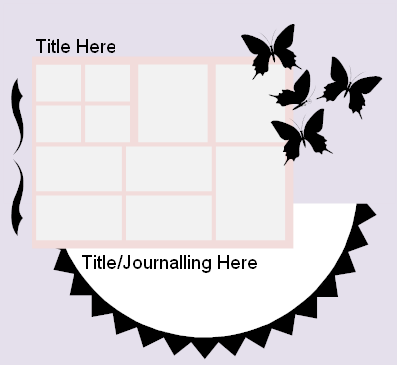
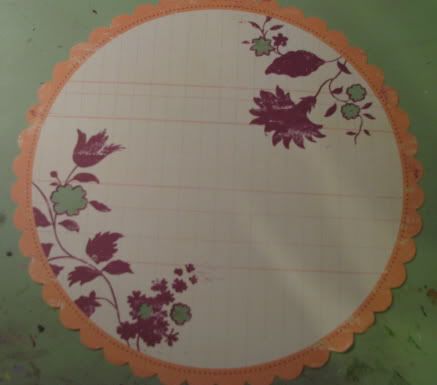
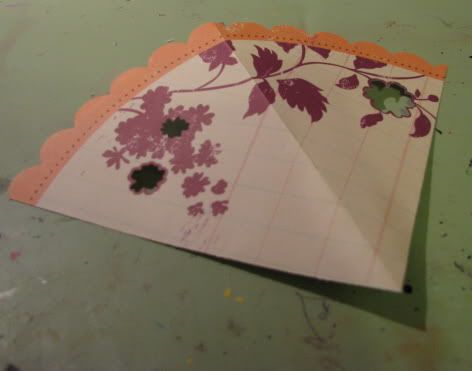
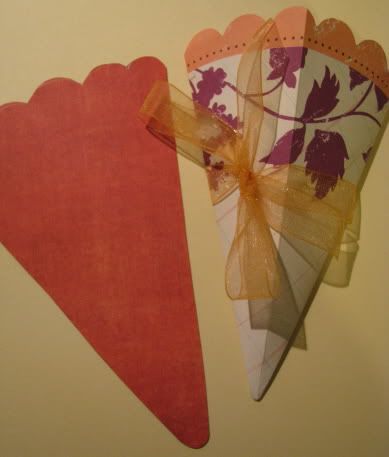
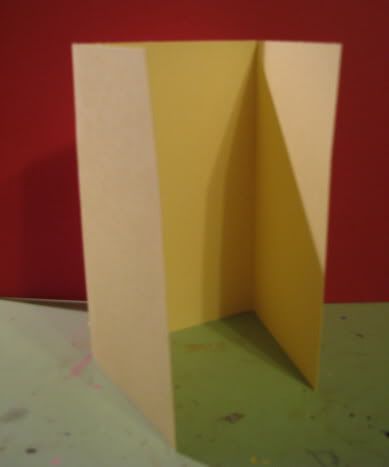
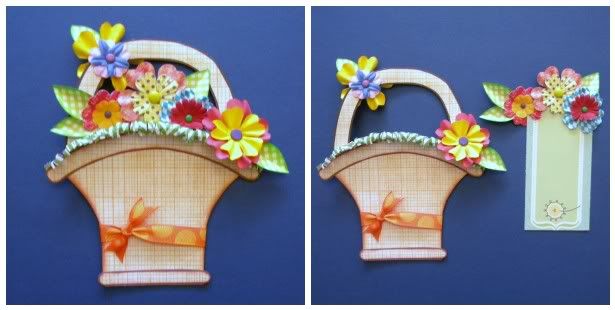
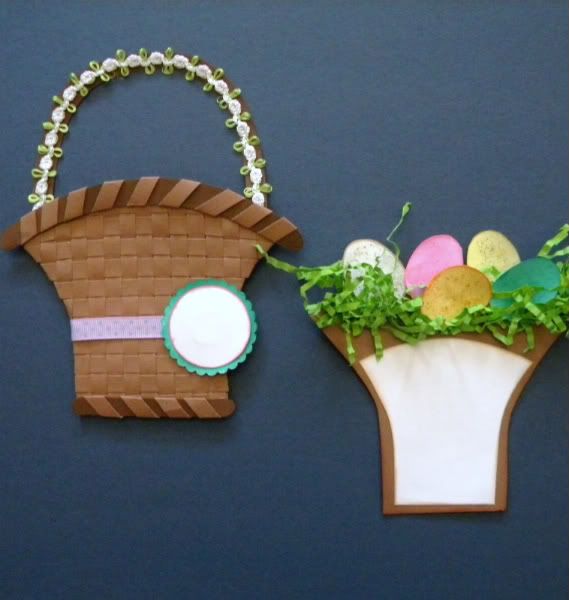
Here are both sketches and samples with each!

Image

Image

Image

Image

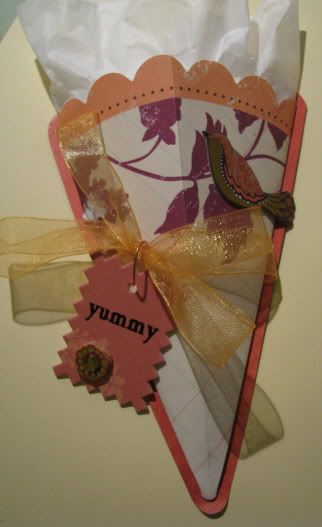
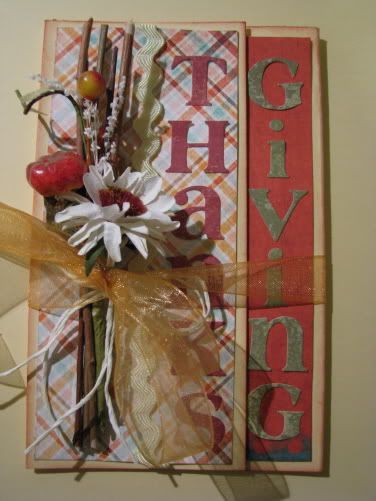
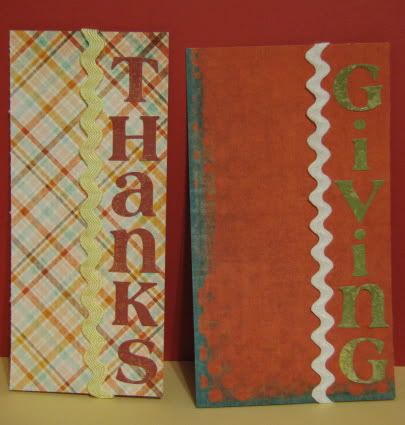
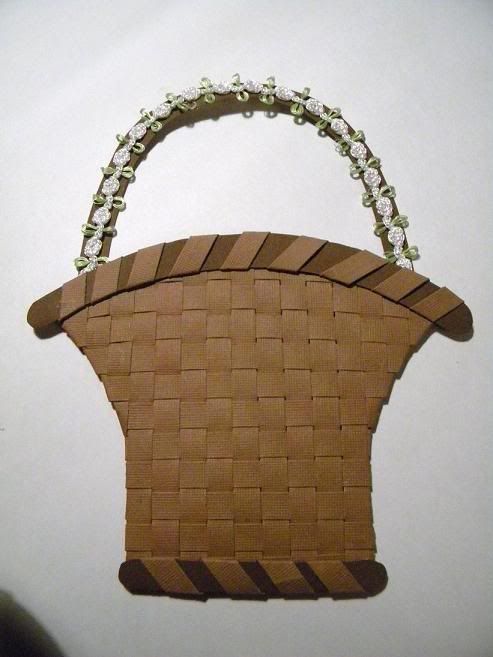
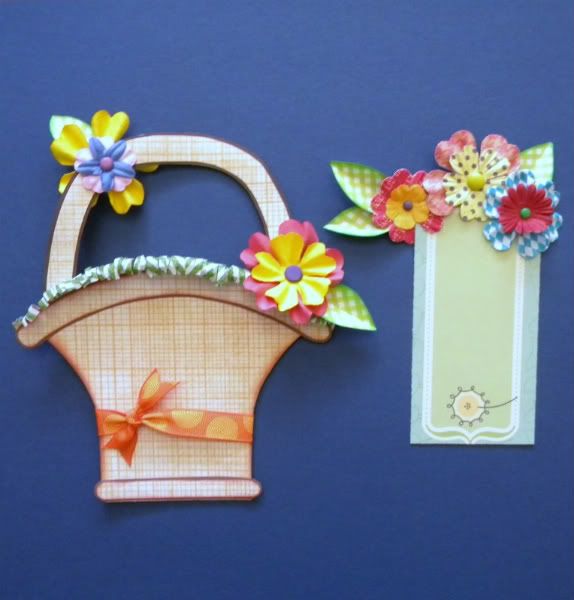
On my cards from the stash...card #1 I used 8 alpha stickers and stickers, on card #2 I used orange cardstock and 1 Large (2" or greater) flower

This challenge is due Saturday, the 28th at midnight CST. Post your cards in our gallery and add a link and/or images here to be eligible for prizes.

Michelle's Bonus Sketches

Here are a few more sketches for you crazy crop-scrappin' girls!
Image
Feel free to substitute those flowers for butterflies, buttons, paint splatters, stars...whatever you'd like.

Image
You can fit anywhere from one to five (or even more) photos on this one. Just place a photo in the middle section and papers/embellies in the other two, or use three long narrow photos, or break down the bottom row into three small square pics.

Image
I love grids! There's just something very appealing about lining everything up in nice neat little rows. This sketch is full of options. Use a bunch of photos, or just one or two. Mix in some pretty papers, or lots of journaling blocks. Throw in a sprinkling of embellies that *leak* outside the boxes for more interest. ots of options waiting for you here!

I included measurements for those of you that may be helped by that. You are by no means locked into those. Use whatever measurements you'd like based on your photos.

This challenge is due Saturday, the 28th at midnight CST. Post your layout in our gallery and add a link and/or image here to be eligible for prizes.

Lee's Sketch #2

I really used up some old stuff on this LO and I hope you will be inspired to do the same. It feels so refreshing to dig into that stash and get rid of some of those items. Items used: paper clip, rub-on, eyelets, wooden & plastic embellie's from eon's ago, journal tag and a sticker!
Image

Image

This challenge is due Saturday, the 28th at midnight CST. Post your layout in our gallery and add a link and/or image here to be eligible for prizes.

Jules' Sketch #2

Another sketch

Image

Image

Items I used from the stash list:

12" of fiber (it is two 12" pieces tied together)
floral paper
chipboard alpha
something clear (the thing that says 'laugh' is from the Aug petite kit! A little journaling type square, I put pp behind it and then a rubon on top of it!)

This challenge is due Saturday, the 28th at midnight CST. Post your layout in our gallery and add a link and/or image here to be eligible for prizes.

Teresa's Sketch

Hi Everyone :mrgreen: Hope you enjoy the sketch

Image

In my example I used: 12 inches or more of fiber
Floral Patterned paper
Chipboard
Glitter
Bird
2 Pictures

Image

This challenge is due Saturday, the 28th at midnight CST. Post your layout in our gallery and add a link and/or image here to be eligible for prizes.

Michelle's Sketch

For all you multi-photo layout lovers out there, I have a three photo sketch coming at you. Remember, sketches are jumping off points. Flip it, rotate it, swip-swap item placement, make it you own. The important thing is that you use it to inspire your layout and get another memory recorded!

The sketch:
Image

My layout:
Image

I dug my hands into three stashes to create my page: my own, Carla's (from the stash swap--the numbers and chipboard), and Scrapbook Heaven's (from the August Petite Kit--all the pp's), and used the following items:
*5 brads
*chipboard (heart)
*floral pp
*striped pp
*polka dot pp
*numbers

Can't wait to see what you do with this sketch!

This challenge is due Saturday, the 28th at midnight CST. Post your layout in our gallery and add a link and/or image here to be eligible for prizes.

Lee's Sketch

I just know we all need to use more photos, so with this sketch you can do that, YAY!! I've been making my mom a special album, this is one of her pages. Hope you like it. The four items I used: the color orange, a rub-on, 2 or more photo's and a bird (was on the paper).

Image

The Sketch:

Image

This challenge is due Saturday, the 28th at midnight CST. Post your layout in our gallery and add a link and/or image here to be eligible for prizes.

Jule's Sketch #1

Okay...here is a simple sketch and even though I only have one photo on it you could easily do more!

Image

Image

Items I used from the 'stash'
5 eyelets
6" of lace
#21, 6 or more small flowers
30 words of journaling

(there are also stickers on here! The little hearts)

This challenge is due Saturday, the 28th at midnight CST. Post your layout in our gallery and add a link and/or image here to be eligible for prizes.

Haydee's Sketch

Image

Image

On this layout I used a button, rubons, pom-pom ribbon, chipboard, glitter and a small wooden popsicle stick. Sure did feel good to use up some of that stuff that's been hanging around in my stash!

Go ahead and challenge yourself! Create a layout using things from your stash.

This challenge is due Saturday, the 28th at midnight CST. Post your layout in our gallery and add a link and/or image here to be eligible for prizes.

Carla's Sketch

Image

In my sample, I also used some stash items:
2 photos on one page
sticker (non-alpha) - the bracket
die cut - the tag
alpha stckers

Image

This challenge is due Saturday, the 28th at midnight CST. Post your layout in our gallery and add a link and/or image to be eligible for prizes.

April's Sketch

Happy Sketch Crop, everyone!!
Here's my sketch:
Image

And my LO:
Image

From the stash list I used:
Exactly 2 pictures
Staples
Floral pattern paper
Felt

This challenge is due Saturday, the 28th at midnight CST. Post your layout in our gallery and add a link and/or image here to be eligible for prizes.

Use Up Your Stash Sketch Crop

Scrapbook Heaven is back at it with another crop.  This time we're challenging you to Use Up Your Stash and create layouts based on the sketches the DT has prepared for you.


Here's how it works:
     *Use up to 4 items from the stash list (see below) on each of your pages.  
     *Each sketch can be used up to two times.  You must flip or rotate the sketch for your second layout.
     *For every 2 layouts or 4 items you complete/use you will get 1 entry into the prize drawing.
     *Your LO's can be based on the sketches, can use stash items from the list, or a combination of both.  In other words, you do not have to use the list, or you do not need to use the sketches, but you must do one or the other.  Make sense? 


If you have any questions, please come over to the forum and ask it here.  


All layouts must be posted to the gallery and linked to the appropriate sketch thread in the forum or supply list thread by August 28th at midnight.


The stash list:
1. 5 eyelets
2. 1 ft of fiber (not ribbon)
3. 5 brads
4. 3 medium size flowers (1" or larger, not cut from pp or ON the pp!)
5. tree (not in a picture!)
6. 7 buttons
7. 2 photos on one page, no more, no less
8. orange cardstock
9. 3 different ribbons (on one layout!)
10. at least 6" lace
11. bird (not in pic)
12. stamped image
13. sticker (non alpha)
14. Jewels/gems - more than 2
15. blue cardstock
16. chipboard alpha, at least 4 letters
17. chipboard NON alpha
18. die cut (think journaling block if you don't have a die cut!)
19. Something metal (not brads or eyelets)
20. Staples (more than 1)
21. at least 6 small flowers, less than 1"
22. floral patterned paper
23. polka-dot patterned paper
24. green cardstock
25. emboss (dry or wet)
26. animal (other than bird and not in picture)
27. paint
28. felt
29. alpha stickers - minimum of 8 letters
30. 30 words of journaling (cannot include title or in a quote, must be actual journaling!)
31. photo corner
32. numbers
33. striped patterned paper
34. punch
35. something clear (think vellum)
36. rub-on NON ALPHA
37. hand stitch (can be done with pen or actual thread!)
38. glitter
39. 1 LARGE flower, 2" or larger
40. paper clip

Saturday, August 14, 2010

Card Crop: Friendship with Lee

The meaning of a true friend is someone who gives you chocolate, am I right??? So I've created a special way to give all my friends a special treat packaged in a unique way. I hope you like it! I know this isn't quite a card, but it does fit in a 4X6 envelope!!

I call these the CANDY GRAMS!


Instructions:

1. Take any piece of 12X12 scalloped paper and divide it into four equal parts. Cut the four pieces and set three aside.

2. Fold your 1/4 piece in half and then in half again.
3. Adhere the two back pieces together. You have now formed your candy gram case.
 4. Cut a piece of coordinating cardstock for the backing, each scalloped paper will be different. I laid my candy gram on the card stock and traced around it, leaving about a 1/4 inch all away around and cut it out.
5. Attach ribbon to your candy gram before adhering this piece to your cardstock backing.
 6. Embellish, add a chocolate bar and give it away today, then go ahead and make 3 more!!


Whew!  That's all of them!  Hope you had fun on our 10 in Ten Card Crop.  Remember, you'll have until Monday, the 16th at midnight CDT to post your card in our gallery and add a link in the comments here or in the matching thread in the forum {linked} to be eligible for prizes.

Card Crop: Thanksgiving with Lee

I'm not sure how many of us actually send thanksgiving cards. But I really enjoy the earthy colors of thanksgiving and I just know a card made with such colors would brighten up anyone's space, so lets make a thanksgiving card and promise to mail it to a friend this year!!

Here it is - simple yet elegant!!

Image

Instructions:

1. Cut an a piece of cardstock so it measures 10 1/4 X 6 inches.
2. Score one side 2 7/8
3. Score the other side 3 1/2
It should look like this (with the shortest side being the front page.
Image
4. cut two pieces of patterned paper: one that measures 3 1/4 x 5 3/4 and one that measures 2 1/2 X 5 3/4.
5. Attach lettering down the sides of the patterned paper and attach ribbon. I used Basic Grey letters, worked perfect.
6. Attach the patterned paper to the card stock.
Image
7. Embellish, ink edges and wrap with one larger piece of ribbon.

You'll have until Monday, the 16th at midnight CDT to post your card in our gallery and add a link in the comments here or in the matching thread in the forum {linked} to be eligible for prizes. We'll see you in an hour with another card.

Card Crop: Thinking of You with April

To me a "thinking of you" card can be any random little thing meant to bring a smile to the recipient's face.

For my "card" I repurposed an almost empty spool of ribbon.

Image

I simply took my spool of ribbon, traced two circles on patterned paper, then used the paper to cover the spool. I embellished the front and added wings to the back.

The last bit of ribbon on the spool unrolls to reveal the sentiment.
Image
It can then be rolled back up and held in place with a decorative pin.

Tip: If you want to write the sentiment on you ribbon, test your pen on a scrap of the ribbon first. I chose a TIGHTLY WOVEN, not shiny, ribbon (it is actually a print on the other side, but I unrolled it and then re-rolled it wrong side out so that I could use the white) and a blue sparkly gel pen.


This particular card has an "M" for Magic and the sentiment reads "Someday you will be old enough to start believing in magic again."

This "card" idea would also make a great embellishment for the front cover of a minibook!

You'll have until Monday, the 16th at midnight EDT to post your card in our gallery and add a link in the comments here or in the matching thread in the forum {linked} to be eligible for prizes. We'll see you in an hour with another card.

Card Crop: Easter with Teresa

Happy Easter!!!!
Okay well, maybe not quite yet :mrgreen: But its never too early to get started. And this card is supper versatile! with flowers it would work for mothers day, thinking or you, get better soon, a bridal shower....etc. Also with just a little change in shape you can make a flower pot or purse with the same instructions!

I made two variations of this card for you, the first one with the basket weave looks really cool in person but is time consuming, so I thought I would do a pattern paper one also.

Image

Image

Image

Here is the basic pattern for the flower basket, I drew this by hand on cardstock, you can change the shape how ever you want (you can also save this pic and print it out to size and use the pattern)
Make sure to place the bottom of the basket base on a fold...this is going to be a pocket card so it needs a front and back flap!

Here are all of my base pieces cut out of cardstock, I chose to do two colors of brown for a little depth.

Image

Image

I did a basic paper weaving on the front cover, using 1/4 inch strips of paper. The only tip is to crease the papers around the sides of the basket. all of the ends of the strips are hidden inside the pocket after it is glued closed. To hide the ends that are folded over along the bottom..I cut out a second bottom strip and covered them with it.

after weaving (if you are doing that) glue the handle inside the card, along the backside of the "pocket" and then glue the sides shut..creating the pocket :mrgreen:

I wrapped some extra strips (from the weaving) around the top and bottom pieces..just thought it looked cool :D

Image

For the "tag" inside the pocket, you can either use the same template as your base and just cut it down about 1/4 inch (like I did in the 1st example) or you can use a premade tag (like the 2nd one)

Now the fun part...decorating them :mrgreen:
(make sure to put atleast part of your embellies on the top of the tag)

Image

these eggs were made by tracing the inside of the thumb hole on my scissors :lol: then glimmermisted and glittered. The "grass" is just shredded crimped paper.

Image

simple layered flowers and brads. The grass is a strip of paper that is fringe cut and then curled around a paint brush.

Can't wait to see what you come up with :D

You'll have until Monday, the 16th at midnight CDT to post your card in our gallery and add a link in the comments here or in the matching thread in the forum {linked} to be eligible for prizes. We'll see you in an hour with another card.